I Built a Home Display With Three Screens and Nothing Else
I like the idea of a home display. A small screen on the desk that shows the time, switches the lights and runs a timer. What I do not like is everything that usually comes with one: an app grid, an account, notifications, and a gallery of clock faces to scroll through.
So I built the small version. It is called Kenko Home, it runs on a pocket sized M5Stack CoreS3 board, and it has three screens. The code is open source.
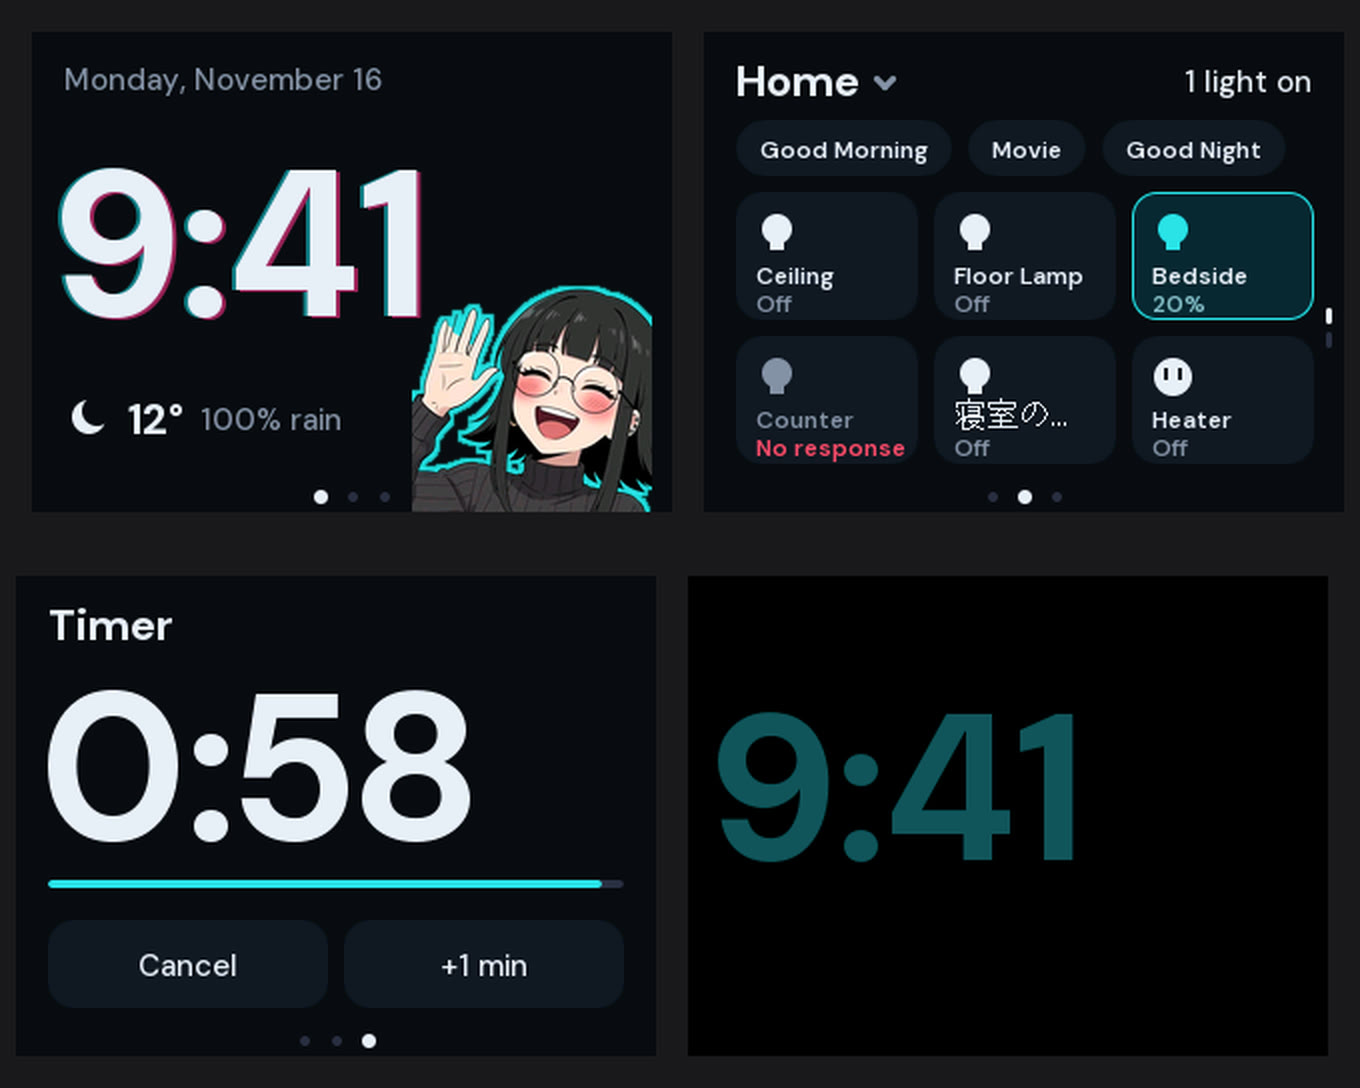
Three screens and nothing else
The hardest decision was what to leave out, so I made it first.
Clock. The time, the date, the weather, and one line about the house. At night it becomes the time alone, dimmed, on black.
Home. Your Apple Home as tiles. Tap one to switch it. Scenes sit along the top, a tap on the title moves through the rooms, and a swipe up shows more.
Timer. Six presets and one timer. While it runs, it shows on the clock too.
You swipe left and right to move between them. Leave it alone and it goes back to the clock. That is the whole interface.
A 320 by 240 screen is a good teacher. There is no room for a second idea on any screen, so each one has to be about a single thing, in type big enough to read from across the room.
The character
Kenko is a character from my manga. Every few minutes she jumps up on the clock, waves, and drops back down. Tap the clock and she says hi back. When a timer ends she gives you a thumbs up.
She does nothing useful, and she is the reason the thing feels like mine and not like a dashboard. You can turn her off with one command, which I think matters. Personality that cannot be switched off turns into noise.
Why Apple Home needs a Mac in the middle
This is the part that surprises people. You would expect a board on the same wifi to simply talk to the lights.
It cannot. HomeKit only talks to Apple's own frameworks. A microcontroller has no way in. So the repo includes a small Mac app, the bridge, that does the talking. It reads your home through Apple's framework and serves it to the board over the local network as a tiny HTTP API. The board finds the bridge by itself with Bonjour.
The bridge shows a key in its window. You give that key to the board once, and after that other devices on your wifi cannot switch your home through it. The key travels over plain HTTP, so it is a lock for a network you already trust, and the README says so.
The clock, the weather and the timer work without any of this. If you only want those, you never need the Mac.
A made up home for building
You do not want to design a light switch screen by flicking your real bedroom lights two hundred times. So the repo ships a mock bridge: a short Python script that serves a pretend home with rooms, lights, a heater and one device that never answers.
That last one is on purpose. A tile that says "No response" in red is a state every smart home has and most demos hide. I built the Home screen against the mock, which is why it has a designed answer for an unreachable device, a room with too many tiles, and a name too long to fit.
Setup over the cable
The usual way to set up a device like this is a phone app or a wifi portal with a QR code. I built the portal and then removed it. For a board that sits next to the computer that flashed it, the cable is simpler and nothing private goes over the air.
./install.sh
uv run --with pyserial tools/kh.py setup
The first line builds the firmware and flashes it. The second asks for your wifi, your city and how you like the clock, and sends the answers down the cable. The board keeps them. Nothing about your network is stored in the repo or compiled into the firmware.
Every setting works the same way, as one line of text:
kh.py send "theme dark"
kh.py send "night 23-6"
kh.py send "mascot 5"
A board that tests itself
The same cable makes the board testable. One command asks it for a screenshot: the firmware sends back the exact frame that is on the screen, and the tool saves it as an image. Another sends a tap or a swipe.
With those two, a script can drive a plugged in board through every screen and check the result. Mine runs 17 checks. It only taps Home tiles when the bridge is the mock one, so a test run can never turn off a real light.
If you build hardware projects, add the screenshot command before anything else. Being able to see the real screen from your terminal changes how fast you can work.
What it is made of
The firmware is five small files: touch and the main loop, the screens, the data (wifi, time, weather, home), the character, and the settings. It is built on M5Unified. The weather comes from a free public API, with a second source as a backup for when the first one times out.
There are two themes. Dark, which is blue black with a line of cyan, and light, which is paper and ink. The font is DM Sans.
Get it
The code is on GitHub at AnimaEcho/kenko-home under the MIT license. Kenko's artwork is not part of that license, so swap in your own character or turn her off.
You need a CoreS3 or CoreS3 SE, a USB-C cable, and uv to flash it. For the Home screen you also need a Mac that stays on in the house, with Xcode and an Apple developer account, because the bridge uses the HomeKit capability.
I built it because I wanted a quiet object on my desk. The lesson I keep relearning is that the small version of a product is usually the one I actually wanted.